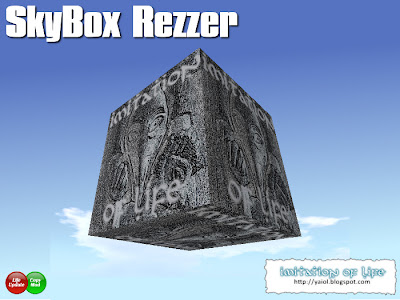
Greetings you have in your hand one of the most sophisticated SkyBoxes available on Second Life.
Free Edition
Where to begin
For using your SkyBox Rezzer just rez it on the floor and click on it. It is as simple! Default action associated to the SkyBox Rezzer is to sit on it.
In this help a clear distinction will be made between the SkyBox rezzer (the item present in your inventory) and the SkyBox itself, which is made of six variable sized panels.
Choose a Destination
When you sit on your SkyBox Rezzer, the following dialog will popup:
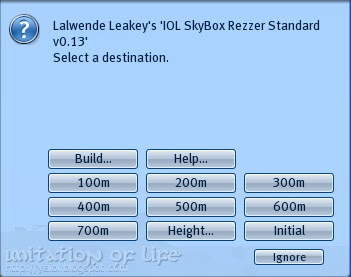
Choose a destination among the seven ones proposed, and you will be instantanly teleported to the selected height. If you choose a destination below the current ground height, you will be warned and it won't operate.
Watch out, if your camera still focus on floor be aware to restore default focus using the Esc-key.
If the default height does not suit your needs, you may choose a custom one using the "Height..." command of the menu.
Verify actual place is well suited
Once you have been teleported to the sky, following menu will popup:
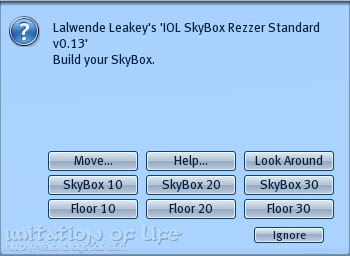
The first step before rezzing-up the SkyBox, is to verify it will not interfere with other buildings next to your current position. You may use the "Look Around" command to make move your camera all around you scrolling from down to up.
If your current position does not suit you may choose another one using the "Move..." command to select an other height (see choose a destination).
When you are at the right location, build your SkyBox :
The SkyBox Rezzer is delivered with three sizes :
- 10m using 6 prims
- 20m using 6 prims
- 30m using 54 prims
You can build an entire SkyBox or just the floor. Your choice might depend on what kind of work you would like to do.
Modifying the appearance of your skybox
Once your SkyBox has been build you may modifiy its appearance by directly clicking onto any of the walls, the following dialog will popup:
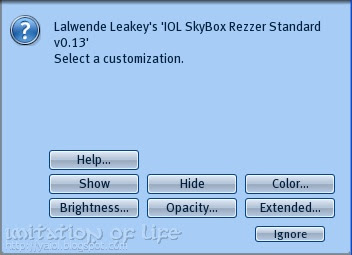
Show / Hide
Show / Hide commands allow you to hide / show the SkyBox rezzer.
Color
Color your SkyBox with one of the thirty predefined colors :
White, Black, Gray 80%, Gray 50%, Gray 25%, Dark Red, Red, Pink, Rose, Dark Violet, Violet, Lavender, Brown, Orange, Light Orange, Gold, Yellow, Light Yellow, Dark Green, Green, Sea Green, Bright Green, Light Green, Lime, Dark Blue, Blue, Light Blue, Pale Blue, Cyan, Indigo
Brightness
Brightness on is really useful if you like to have an uniform background without shadows, e.g. for taking pictures.
Opacity
Choose between one of the four level of opacity. Opacity only acts on interior walls, so you may see exterior environnment without being seen.
Extended
The extended menu allows you to apply a set of simultaneous customizations. The standard version is released with five customizations:
- Blank - take away any texture from the walls;
- Grid - applies a grid texture on the walls;
- Scorpion - change your SkyBox using the Scorpion colors;
- True Romance - you really should like Pink for this one;
- Watermelon - using one a the great freebies Textures supplied by Torley Linden.
Using the Teleporter
Once your SkyBox has been builded, the SkyBox Rezzer can be used as teleporter to your initial position at the ground. Click on the SkyBox Rezzer, it will position itself in the middle of the SkyBox, the following menu will popup :
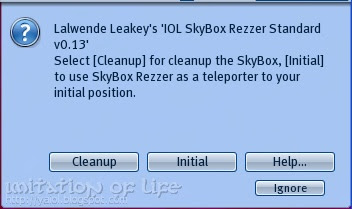
By selecting the "Initial" command you will be teleported to your initial position at ground. Your SkyBox will remain builded in the sky. At any moment, you can come back in your SkyBox while sitting once again on the SkyBox Rezzer.
Cleaning up the skybox
When you will end up with your works, don't let everything rezzed. Remember to
delete your SkyBox. Click on the SkyBox Rezzer, it will position it self in the middle of the SkyBox, the following menu will popup :

By selection the "Cleanup" command, SkyBox panels will be unrezzed, you will be teleported to your initial position on ground, ejected from the SkyBox Rezzer and finaly it will unrezz itself.
Pro Edition
Following features are only availables on Pro Edition of SkyBox Rezzer. You can find this version going at our Shop
SkyBox Rezzer Pro has a set of advanced features allowing to personalize your SkyBox :
- A set of commands for modifying the panels appearance (color, transparency, brightness & texture)
- A script reading notecards so you can save your customizations and use it again at any time.
- A mechanism allowing to store objects into the SkyBox Rezzer, those objects can be automatically
rezzed and position themselves.
Alterting the .ini notecard
You can set up your SkyBox Rezzer Pro by altering a notecard in its contents called ".ini". Before editing this notecard, we strongly advise that you to make a backup copy in your inventory to refer to, in case your edited copy becomes corrupt.
For altering the ".ini" notecard, rezz the SkyBox Rezzer from your inventory or wear it. Next rightclick on the object and select 'Edit' in the pie menu. Click the "more" button if needed and select the "content" tab. Double click the ".ini" notecard to open and edit it.
Every command that work as spoken command (see below) can be used in the notecard. Any lines that begin with a double slash will be treated as comments and will be ignored.
Once you have finished editing the notecard, you must reset your SkyBox Rezzer Pro in order for the scripts to pick up the changes. You may do this by either:
- Using the command Tools / Reset Scripts while it is selected
- Using the following command : /3 reset
This will reset all the scripts in the device, which may take a few moments, depending on the speed of the sim you are currently in. Setting the customization directly in the SkyBox Rezzer .ini notecard also means that every customizations will be saved even if the SkyBox Rezzer scripts has to be reset.
Here is the .ini notecard shipped with your item:
// setting up the default channel
channel 3
// setting up the default skybox size
size 30
// setting up autodie feature
autodie on
Once you have finished your modification, unwear the SkyBox Rezzer.
Command channel
The SkyBox Rezzer can be controlled using spoken commands. These spoken commands are listed below and are given on a specific command channel (which can be set/changed via spoken command). The default channel is 3.
Command example:
/3 hide
For setting up a customized channel use command channel in your ".ini" notecard see above.
Standard commands
Here is a short list of command you can use
a parameter noted
a parameter noted [parameter] indicates a facultative parameter, note that when specifying a facultative parameter all preceeding facultative parameters should also be set.
? channel
set current channel to specified one
? hide
hide the SkyBox Rezzer
? show
show the SkyBox Rezzer
? autodie
toggle autodie feature. onoff parameter should be one of the following value:
on : autodie feature is set
off: autodie feature is unset
? move
move the SkyBox Rezzer to specified height (in meters), if keyword 'ini' is used then move to initial position of SkyBox Rezzer
See previous paragraph "Choose a Destination"
? look
move your camera all around your actual place from down to up
See previous paragraph "Verify Actual Place Is Well Suited"
? size
set the default skybox size used by command build
? build skybox [size] [panels]
build a skybox using the specified size, if no size was specified the default size will be used (see previous command).
panels specify the panels being rezzed if no panels are specified all six panels will be rezzed. The panels should be defined using one of the following keywords :
. individually each panel : botton, top, north, south, east, west,
. all the walls using : walls
. all the walls + top : wallstop
. all six panels using : all
NB: bottom panel is always added to your panels definition, so /3 build skybox 20 walls will rezzed the 20 meters width skybox with no roof.
? cleanup
cleanup the SkyBox
See previous paragraph "Cleaning The SkyBox"
Customizing apppearance of Panels
You may customize the appearance of SkyBox panels using the following commands : alpha, color, bright, texture.
Each of these command use a similar syntax (first parameter allows you to specify which panels will be affected by the command):
cmd
The target should be defined using one of the following keywords :
. individually each panel : bottom, top, north, south, east, west,
. all the NSEW walls using : walls
. all the NSEW walls + top : wallstop
. all six panels using : all
example:
following command
/3 color north FFFF00
apply a yellow color on the north panel
Opacity
? alpha
Alpha parameter specify the opacity from 0 (transparent) to 1 (opaque)
Color
? color
You can use one of the following thirty predefined color:
white, black, gray80, gray50, gray25, dred, red, pink, rose, dviolet, violet, lavender, brown, orange, lorange, gold, yellow, lyellow, dgreen, green, sgreen, bgreen, lgreen, lime, dblue, blue, lblue, pblue, cyan, indigo
Or directly specify a RGB value using hexadecimal notation.
example:
following commands
/3 color walls 000080
/3 color walls dblue
will apply the same dark blue color on the walls
Brightness
? bright
toggles brightness, onoff parameter should be one of the following value:
on : target panels will be fullbright
off: target panels will reflect light depends of their slope and exterior light
Texture
? texture
will apply texture to specified panels
repeats and offset should specified as vector (watch out don't use blank space(s) to separate values)
? texture
when the keyword 'stretch' is used, the texture is streched to all the surface of panel, this is definitely usefull for the 30 meters with panels.
Create a customization notecard
You can assemble a set of customization commands in a note card. Every previous command should be used.
Create an empty notecard in your inventory, rename it using a dot as prefix.
Write as many commands you want (see below for an example), save it and drag it into to your SkyBox Rezzer.
Once done a new command will appear into the "Extended..." menu, you may also run the customization notecard while using /3 run
Example: Here is the ".True Romance" customization notecard
// reset current parameters
alpha all 1.0
blank
// color all panels in pink
color all pink
// color roof dark red
color top dred
// texture wall with Torley "Romance Blossoms"
texture walls 382b577e-528c-c3ac-f786-47f125fc4138 <2.0,2.0,0.0> <0.0,0.0,0.0>
// texture floor with Torley "Battle Field of Love"
texture bottom da989136-dadd-74f9-e01c-017af2f0f670
Linking an object to the SkyBox Rezzer
Any object could be linked to the SkyBox Rezzer and rezzed via the "Extended..." menu. Here is the step by step guide for proceeding. Before altering your SkyBox Rezzer, we strongly advise that you to make a backup copy in your inventory to refer to, in case your edited copy becomes corrupt.
Preparing Object to work with SkyBox Rezzer
- Ask SkyBox Rezzer to give you "SkyBox Rezzer - Object" script using /3 give script
- Rez or Create and object that has at least mod/copy permission where ever you want in the SkyBox
- Drag " SkyBox Rezzer - Object" script into the object
- Take a copy of the object into your inventory
- Drag that copy into the SkyBox Rezzer
Record position of the object
- Ask SkyBox Rezzer to rez you object using /3 rez [ObjectName]
- The Object will rez one meter above SkyBox Rezzer
- Adjust position and rotation as needed
- When ready touch the object
- SkyBox rezzer should say something like : rez Object <1.712433,1.871674,0.456543> <-5.869953,-5.447683,-47.279331>
- Create a customization notecard and copy the result from your History Chat Window into that notecard. Drag that notecard into the SkyBox Rezzer.
- A new command will appeared in the "Extended..." menu
- By using it a copy of your original object will be rezed and position itself at right place
- When everything is fine take a copy of the SkyBox Rezzer into your inventory and use that copy next time
Tips:
- You can mix appearence customization and object rezzing in the same customization notecard.
- Rez as many objects you wanted.
- When SkyBox is cleanup all objects rezzed are unrezzed.
Customize the SkyHome
Any SkyHome could be used instead of one shipped. Before altering your SkyBox Rezzer, we strongly advise that you to make a backup copy in your inventory to refer to, in case your edited copy becomes corrupt.
Preparing SkyHome to work with SkyBox Rezzer
- Ask SkyBox Rezzer to give you "SkyBox Rezzer - Object" script using /3 give script
- Rez your SkyHome
- Drag " SkyBox Rezzer - Object" into your SkyHome
- Take a copy of your SkyHome into your inventory
- Rename it to SkyHome
- Delete or rename original SkyHome in your SkyBox Rezzer
- Drag your modifie SkyHome into the SkyBox Rezzer in place
- Take a copy of the SkyBox Rezzer into your inventory and use that copy next time.
You may found SkyBox Rezzer
In Shop in world
On SL Exchange

No comments:
Post a Comment